3. Triangulation developments:
Made from polyhedrons, single-curved surfaces, and wrapped surfaces. The development involve subdividing any ruled surface into a series of triangular areas. If each side of every triangle is true length, any number of triangles can be connected into a flat plane to form a development. This is illustrated in figure 7 for a triangular pyramid. Triangulation for single curved surfaces increases in accuracy through the use of smaller and more numerous triangles. Triangulation developments of wrapped surfaces produces only approximate of those surfaces.
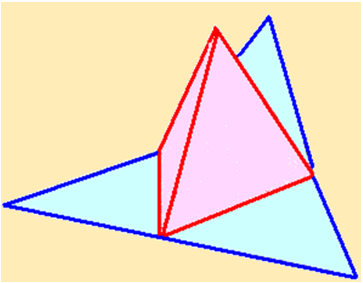
Figure 7 shows the triangulation method for obtaining the development of a triangular pyramid.
4.Approximate developments
Approximate developments are used for double curved surfaces, such as spheres. Approximate developments are constructed through the use of conical sections of the object. The material of the object is then stretched through various machine applications to produce the development of the object. This is illustrated in figure 4.
Parallel-line developments
Developments of objects with parallel elements or parallel lateral edges begins by constructing a stretch-out line that is parallel to a right section of the object and is therefore, perpendicular to the elements or lateral edges. Figure 8 illustrates the steps followed for obtaining the development of a rectangular prism by parallel line development. In the front view, all lateral edges of the prism appear parallel to each other and are true length. The lateral edges are also true length in the development. The length, or the stretch-out, of the development is equal to the true distance around a right section of the object.
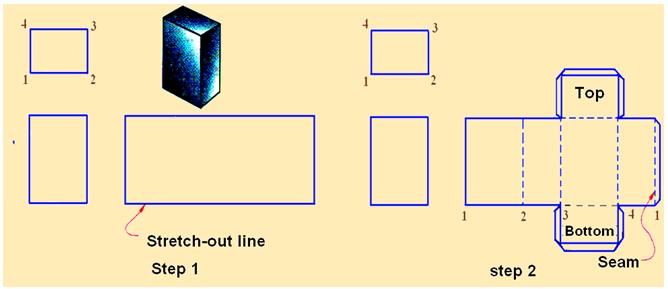
Figure 8. Stepwise procedure for obtaining the development of a rectangular prism.
Step 1. To start the development, draw the stretch-out line in the front view, along the base of the prism and equal in length to the perimeter of the prism. Draw another line in the front view along the top of the prism and equal in length to the stretch-out line. Draw vertical lines between the ends of the two lines, to create the rectangular pattern of the prism.
Step 2. Locate the fold line on the pattern by transferring distances along the stretch-out line in length to the sides of the prism, 1-2, 2-3, 3-4, 4-1. Draw thin, dashed vertical lines from points 2, 3, and 4 to represent the fold lines. Add the bottom and top surfaces of the prism to the development, taking measurements from the top view. Add the seam to one end of the development and the bottom and top.