3.Development of a truncated right circular cylinder
The development of a truncated cylinder is shown in figure 3.
Step1. The top view and front view of the cylinder is drawn. The stretch out line, is aligned with the base in the F.V., is drawn with length equal to the circumference of the cylinder. Construct the rectangle with the stretch out line as one length and height of the cylinder as the width.
Step2. The top circular view of the cylinder then divided into a number of equal parts . The stretch-out line is also divided into 12 equal parts from which vertical lines 1, 2, 3, 4, …. 12 are constructed. The intersection points in the T.V. are projected into the F.V. . Draw horizontal projectors from points 1, 2, 3, …., 12 to intersect the vertical lines 1,2, 3, 4, …. 12 in the stretch out line. , where the projected lines intersect the angled edge view of the truncated surface of the cylinder. The intersections between these projections and the vertical lines constructed from the stretch-out line are points along the curve representing the top line of the truncated cylinder. Join the intersection points with a smooth curve to obtain the developmentof the lateral surface of the cylinder.
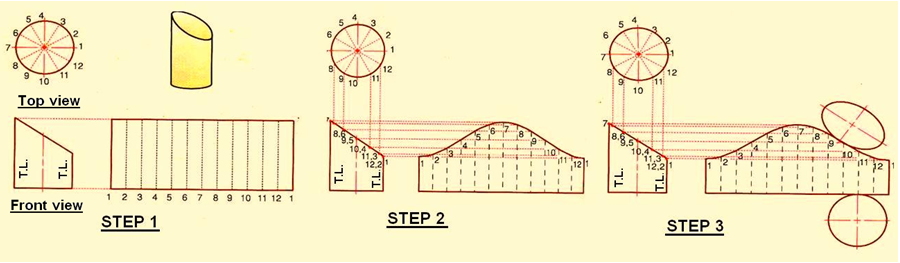
Figure 3. shows the development of a truncated cylinder.
Step 3. Draw the circle with diameter equal to the diameter of the cylinder at any point on the base of the development to obtain the development of the base surface of the cylinder. Draw an ellipse with the truncated length (length 1-7 in the step 2) as major diameter and diameter of the cylinder as the minor diameter on the top part of the development to obtain the final development of the surfaces of the truncated cylinder.